To transfer your existing mails from UNIX mail to Microsoft Exchange, you can use the Outlook import and export tool. The procedure is described in this step-by-step guide.
Important note: These instructions have been translated word by word, so some names in Windows or Outlook may differ from the names in the instructions. However, the pictures serve as a guide.
This guide consists of three parts:
- Step 1: Integrate the UNIX mailbox
- Step 2: Export the email account
- Step 3: Import the emails
Step 1: Integrate the UNIX mailbox
First integrate your UNIX mailbox into Outlook. You can use our guide "Outlook for UNIX mail" as a guide.
Step 2: Export the e-mail account
Open the menu item "FILE" via the tab "Open and export" on the left-hand side of the Outlook start screen.
Then start the dialogue via the "Import/Export" button.
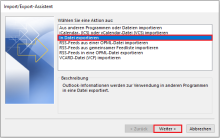
Select "Export to file" as the action and go to the next window with "Next".

Select "Outlook data file (.pst)" as the file type to be created.
Then click on "Next".
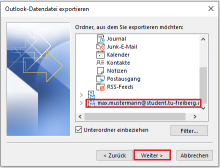
Select the mail directory to be exported from the list.
If you are moving from UNIX mail to Exchange, select your UNIX mailbox here. If you have proceeded as described in the instructions, then this is called IhrLogin [at] mailserver [dot] tu-freiberg [dot] de (IhrLogin[at]mailserver[dot]tu-freiberg[dot]de) (e.g. Max [dot] Mustermann [at] student [dot] tu-freiberg [dot] de)
Then press "Next".
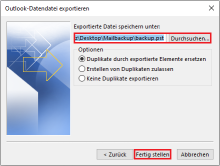
Specify the save location for the export via "Browse", then click on "Finish".
You can optionally enter a password for the export. Confirm with "OK".
The selected mailbox is then exported. This may take a few minutes, depending on the size of the mailbox to be exported.
Step 3: Importing mails
Open the menu item "FILE" via the tab "Open and export" on the left-hand side.
Then start the dialogue via the "Import/Export" button.
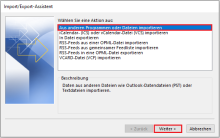
Select the top entry "Import from other programmes or files" and click on "Next".
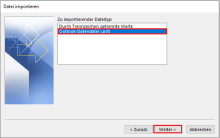
Select "Outlook data file (.pst)" as the file format and go to the next dialogue with "Next".
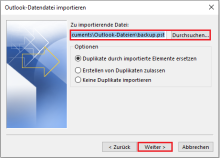
Select the email to be imported via "Browse".
Then click on "Next":
If you have assigned a password to the export, you will now be asked to enter it.
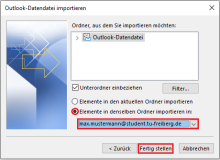
From the list displayed at the top, select the mails or folders to be imported.
Then select "Import items into the same folder in:" and select the mailbox into which the mails are to be imported from the list below.
If you are moving from UNIX mail to Exchange, select your Exchange mailbox here. This is usually simply called " "
Click on "Finish" to import the mails. Depending on the size of the emails to be imported, this may take a few minutes.