The Unixmail mailbox can also be used under Outlook. To do this, it must be integrated via IMAP. We offer you these step-by-step instructions for this.
Important note: These instructions have been translated word by word, so some names in Windows or Outlook may differ from the names in the instructions. However, the pictures serve as a guide.
This guide consists of two parts:
Step 1: Create app password
Step 2: Include mail account in Outlook
Optional: Set up for Outlook 2016 users
Step 1: Create app password
Log in to Self-Service with your central password. Click on the "Email (Unixmail)" tile.
Create an app password for yourself. For better allocation, you can enter a meaningful comment as a description.
Note: This randomly generated password is only displayed once. You can copy it directly to the clipboard.
Step 2: Integrate mail account under Outlook
Search for "Control Panel" in the Windows search bar. Open "User Accounts" and select "Mail (Microsoft Outlook)" from the following list.
A window "Mail Setup - Outlook" will open, please go to "Email Accounts" to start setting up the mail account.
Now select "New".
In the following dialogue, select the item "Manual configuration or additional server types". Then click on "Next".
In the next step, select "POP or IMAP" and go to the configuration dialogue with "Next".
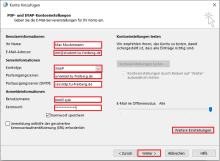
In this mask, enter the following parameters:
- Your name: full name
- E-mail address, e.g.:
- Max [dot] Mustermann [at] student [dot] tu-freiberg [dot] de (Max[dot]Mustermann[at]student[dot]tu-freiberg[dot]de)
- Max [dot] Mustermann [at] chemie [dot] tu-freiberg [dot] de (Max[dot]Mustermann[at]chemie[dot]tu-freiberg[dot]de)
- mm08kuli [at] mailserver [dot] tu-freiberg [dot] de (mm08kuli[at]mailserver[dot]tu-freiberg[dot]de)
(mm08kuli would of course be your URZ login and mailserver your corresponding email alias, e.g. @chemie or @student). @chemistry or @student)
- Account type: IMAP
- Incoming mail server: unixmail.tu-freiberg.de
- Outgoing mail server: secsmtp.tu-freiberg.de
- User name: Your central URZ login
- Password: Important: Do not enter your central university password here, but an app password that you created in step 1.
- Then click on "Further settings"
- Click on the "Outgoing mail server" tab.
- Select "The outgoing mail server (SMTP) requires authentication"
- and "Use the same settings as for incoming mail servers".
- Then click on the "Advanced" tab in the same window.
Enter the relevant port here and select the connection type:
- Incoming mail server 993 or SSL
- Outgoing mail server 465 and also SSL
Then click "OK".
.

All required account settings have been made.
Now click on "Next".
An attempt is then made to send a test email using the connection parameters just entered. If all the details are correct, you can close the dialogue by clicking "Close".
The setup is now complete.
After clicking on "Finish", you will find the UNIX account next to your other mailboxes.
Optional: Setup for Outlook 2016 users

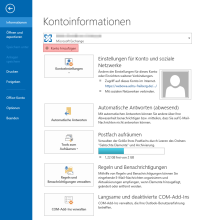
Click on the tab"FILE" in Outlook.

Now click on the "Add account" button at the top of the screen.
You can then continue with step 2 of these instructions.