Certificates are used on the Internet to encrypt and decrypt data and to create or verify digital signatures.
The TU Bergakademie Freiberg is part of the GÉANT framework agreement and uses the Certificate Authority (CA) "HARICA" offered through it as a certification authority. The following instructions show you step by step how to apply for a server certificate via the HARICA certificate manager:
1. Open the certificate manager

First go to the website of HARICA and click on "GO TO CertManager" in the top right-hand corner. A login page will then open.
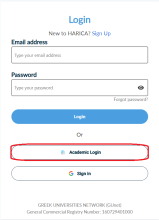
Select "Academic Login" and enter the name "TU Bergakademie Freiberg" under "Find Your Institution".
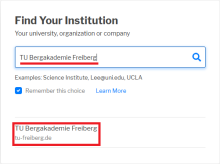
Authenticate yourself with your university username and central university password. In some cases, additional verification with your private token is required. You can find more information on this on our how-to page for two-factor authentication.
2. Requesting a certificate

After successfully logging in, you will be taken to the certificate dashboard. Select the "Server" area in the left-hand sidebar under Certificate Requests.
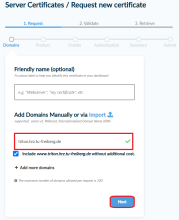
A menu opens with the heading "Server Certificates / Request new certificate". Here you can enter the desired server domain for which the certificate is to be requested in the "Add Domains Manually" field. You can then go to the next menu with "Next".
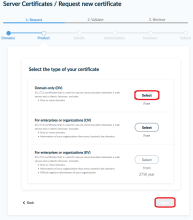
You then have the option of choosing between different server certificates. We recommend selecting "Domain-only (DV)" here. Once you have made this selection, click on "Next" to go to the next page.
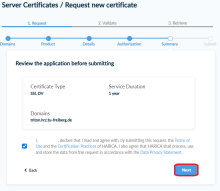
In the subsequent application overview, please check all details carefully. In particular, check the certificate type (SSL DV), the specified duration (1 year) and the correct domain. Once you have accepted the conditions, click "Next" again.
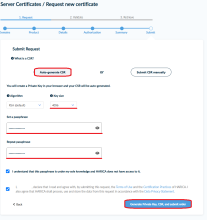
Now comes the crucial step for creating the CSR (Certificate Signing Request). Select the "Auto-generate CSR" option here. By default, RSA is recommended as the algorithm and the key length should be set to 4096. Assign a secure password and enter it a second time for confirmation. After setting the required confirmations, click on "Generate Private Key, CSR, and submit order".
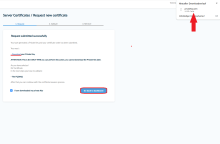
Immediately after submitting, you will be offered the Private Key for download. IMPORTANT: This private key (privateKey.pem) can only be downloaded once and should be saved in a safe place. After you have successfully saved the key, tick "I have downloaded my private Key" and click "Go back to dashboard".
3. Validate enquiry
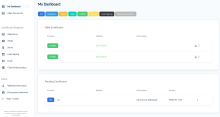
Your certificate request is now displayed in the "Pending Certificates" section and is awaiting confirmation from the university's certificate administrator. The request is automatically forwarded to our certificate administrator. Regular checks are conducted to see if new requests are pending; no further action is required on your part (the review is usually completed within one business day). This validation is necessary for the certificate authority to continue processing your request.
4. Download certificate

Once your application has been approved, the certificate will appear in the "Valid Certificates" section. To download the certificate, click on the download icon next to your certificate and select the appropriate file format.
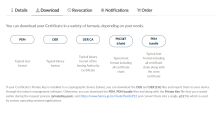
The PEM format is recommended for most web servers. Alternatively, formats such as DER, PKCS#7 (chain) or the PEM bundle are also available.
You can then store the downloaded certificate on your web server and adjust the server configuration accordingly.