Important note: These instructions were translated literally from German. Names of buttons within the software may therefore have different names than those stated in the instructions with "".
Installing and using digital IDs with Acrobat Reader or Acrobat Pro
According to https://www.pdf-insecurity.org/, digital signatures are not correctly checked by almost all PDF readers, including those from Adobe. There are many different ways to trick these PDF readers into displaying forged content as genuine!
Unfortunately, the manufacturer Adobe Systems supplies its Acrobat Reader and Acrobat Pro software with settings that explicitly prevent the use of our normal certificates for digitally signing PDF documents.
It is possible to change these settings. However, both those who want to sign PDF documents and those who want to verify the PDF signatures created in this way must make these setting changes.
There is a simple alternative: Do not sign the PDF file, but the email with which you send the PDF file.
This guide consists of four parts:
- I. Correct root certificates
- II. Import digital ID
- III. Digitally sign PDF file
- IV. Check digitally signed PDF file
Contact us
I. Correct root certificates
Unfortunately, all root certificates on which our digital IDs are based are not accepted by Adobe Acrobat Pro or Adobe Acrobat Reader.
It is therefore necessary to manually import the root certificates of the eligible issuers of digital IDs into the Acrobat software and set them as trustworthy.
The following instructions assume that you are able to provide all qualified signatures in accordance with the eIDAS Regulation of the European Union as well as the root certificates used within the DFN-PKI and all root certificates selected by Adobe.
A sensible alternative would be to trust only the qualified signatures and individual selected root certificates. To do this, you should delete all root certificates and then only import the EUTL and the selected root certificates, i.e. only follow the relevant parts of the following instructions. In particular, you should then not load the AATL!
Save certificate files
- AAA.crt (AAA Certificate Services certificate)
- USERTrustRSA.crt (USERTrust RSA Certification Authority certificate)
- GEANT_Personal_CA.crt (GEANT Personal CA 4 certificate)
- Your own user certificate including private key, if this is not yet installed on the local computer (in PKCS#12 format in a .pfx file; contains private key and certificate).
Step 2: Open settings
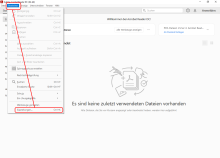
Start Acrobat Reader or Acrobat Pro. In the "Edit" menu, click on "Preferences".
Alternatively, you can also press Ctrl + K.
Step 3: Import root certificates
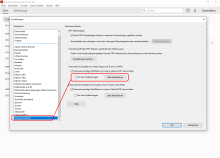
First make sure that Acrobat Reader or Acrobat Pro imports all root certificates supplied by Adobe and the European Union.
To do this, click on Update now under "Load trusted certificates from an Adobe AATL server".
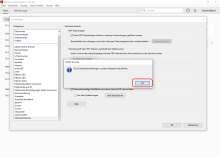
After the security settings have been updated, you will receive a confirmation message. You can acknowledge this.
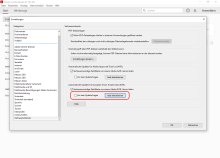
Repeat the same for "Load trusted certificates from an Adobe EUTL server".
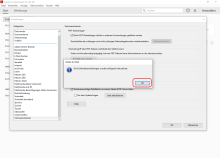
You can acknowledge the confirmation message that appears again.
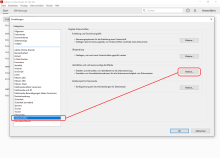
Step 4: Remove the USERTrust RSA Certification Authority certificate:
This certificate is the same as our own root certificate, which is still being imported. However, it is a different certificate (you can recognise this by the issuer, among other things). Unfortunately, Adobe is apparently unable to distinguish between these two certificates.
Open the "Signatures" menu under Settings. There, under "Identities and trusted certificates", select the "More..." option.
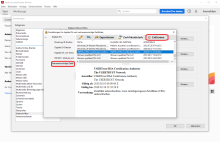
You must select the USERTrust RSA Certification Authority from the long list before clicking on "Remove":
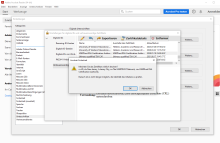
Confirm the security message with "OK".
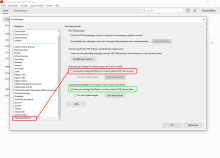
If the Adobe Approved Trust List is updated, this setting would be overwritten again, so this update must be deactivated:
(The European Union Trusted List contains the issuers of qualified signatures according to the EU eIDAS Regulation and should therefore be kept up to date)
To do this, go to the "Trust services" menu under Settings. There should be a tick next to "Load trusted certificates from an Adobe AATL server". You can remove this tick.

Step 5: Import the root certificate AAA Certificate Services and set the trust
To import, you must first select "Other..." again under "Signatures" and then "Identities and trusted certificates".
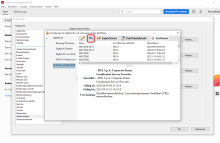
Navigate to the "Trusted certificates" column.
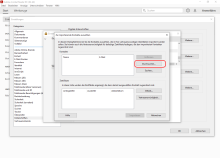
Here you can search for the certificate to be imported.
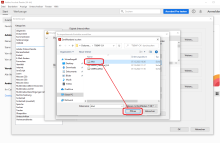
A file browser opens. Search for the previously downloaded AAA certificate in your files and upload it.
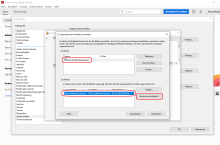
You should click on the certificate in the upper window to enter it in the lower window, then click on it in the lower window and do not import it immediately, but adjust the trustworthiness first.
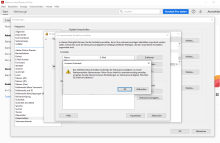
Sometimes a message appears, which you can confirm with "OK".
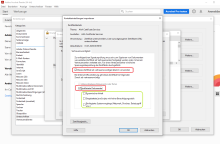
You should not activate the items "Dynamic content", "Embedded JavaScripts with high authorisation level" and "Privileged system processes (network, printing, file access, etc.)". However, "Certified documents" and "Use this certificate as trusted root" should be ticked.
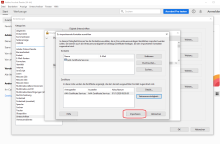
After the previously open window of the trustworthiness settings has been successfully edited, you will return to the overview of the certificates to be imported. You can now click on import and import the AAA certificate.
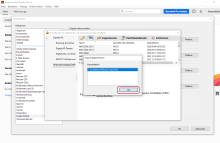
If successful, you will receive a message that you can confirm again with "OK".
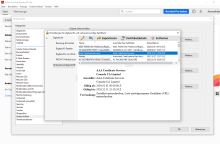
You will now see the certificate in your list of trusted certificates.

Step 6: Import the root certificate USERTrust RSA Certification Authority and set the trust
To import, you must first select "Other..." again under "Signatures" and then "Identities and trusted certificates". Now navigate to the "Trusted certificates" column.

Here you can search for the certificate to be imported.
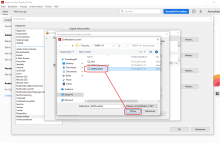
A file browser opens. Search your files for the previously downloaded USERTrustRSA certificate and upload it.
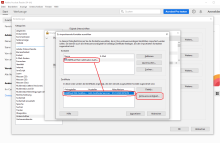
You should click on the certificate in the upper window to enter it in the lower window, then click on it in the lower window and do not import it immediately, but adjust the trustworthiness first.

Sometimes a message appears, which you acknowledge with "OK".
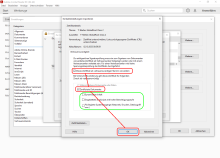
You should not activate the items "Dynamic content", "Embedded JavaScripts with high authorisation level" and "Privileged system processes (network, printing, file access, etc.)". However, "Certified documents" and "Use this certificate as trusted root" should be ticked.
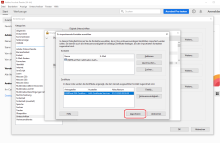
After the previously open window of the trustworthiness settings has been successfully edited, you will return to the overview of the certificates to be imported. You can now click on Import and import the USERTrustRSA certificate.
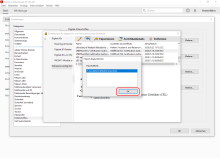
If successful, you will receive a message that you can confirm again with "OK".
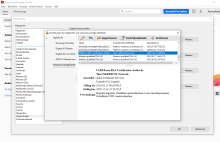
You will now see the certificate in your list of trusted certificates.
Step 7: Import the root certificate GEANT OV RSA CA 4 and set the trust
Follow the identical steps as above for "AAA Certificate Services" (step 5) and for "USERTrust RSA Certification Authority " (step 6), only this time select the file "GEANT_Personal_CA.crt" that you downloaded above.
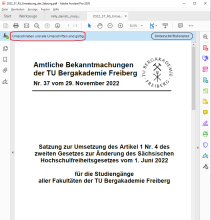
Step 8: Close the setting and check using test PDF file
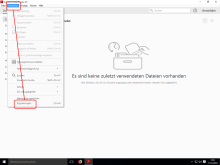
II. Import digital ID
In order to be able to sign your own PDF files, you must import your digital ID if it does not already exist.
Restart Acrobat Reader or Acrobat Pro. In the "Edit" menu, click on "Preferences".
Alternatively, you can also press Ctrl + K to open "Preferences".
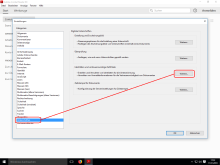
Select the "Signatures" category and click on "More" under "Identities and trusted certificates".
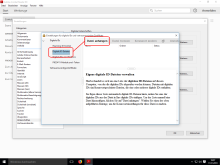
Under "Digital IDs", select the "Digital ID files" area and then click on "Attach file" at the top.
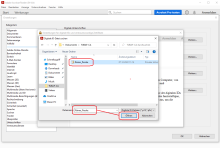
Select the file with your digital ID and click on "Open".
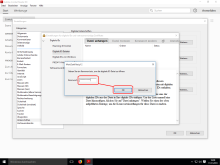
To open the encrypted file, you must enter the password.
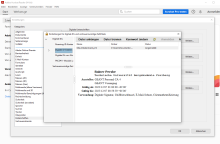
Your digital ID should now appear in the list. You can now close all open dialogue windows.

III. Digitally sign PDF file
Open the file to be signed and then click on "Tools".
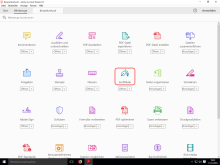
Open the "Certificates" tool.
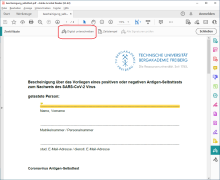
Click on "Sign digitally" in the toolbar added in this way.
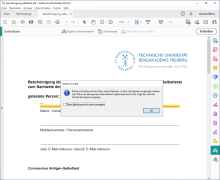
If a message window appears, close it with "OK".
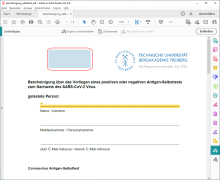
Drag a rectangle with the mouse to where you want information about the digital signature to be displayed in the PDF file.
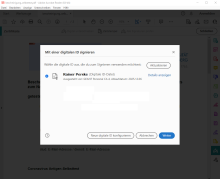
Select your digital ID in the dialogue box that then appears and click on "Next".
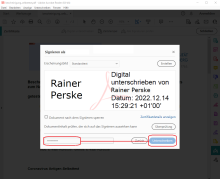
To actually sign the file, enter the password for your digital ID and click on "Sign".
You can then save the file.
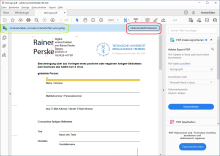
IV. Check digitally signed PDF file
You don't actually need to do anything, as Acrobat Reader and Acrobat Pro automatically check every digital signature and display the result.
You can, however, click on "Signature window" to call up further information.
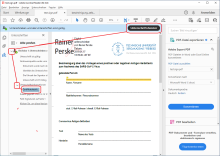
Open the tree structure to display the various information. Details on signing can be found under "Certificate details".
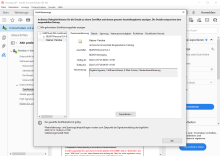
You can check the digital signature personally in the certificate details.
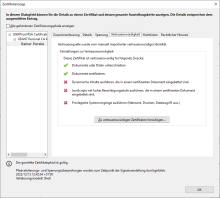
Under "Trustworthiness" you will find an overview of which certificates are classified as trustworthy.
